
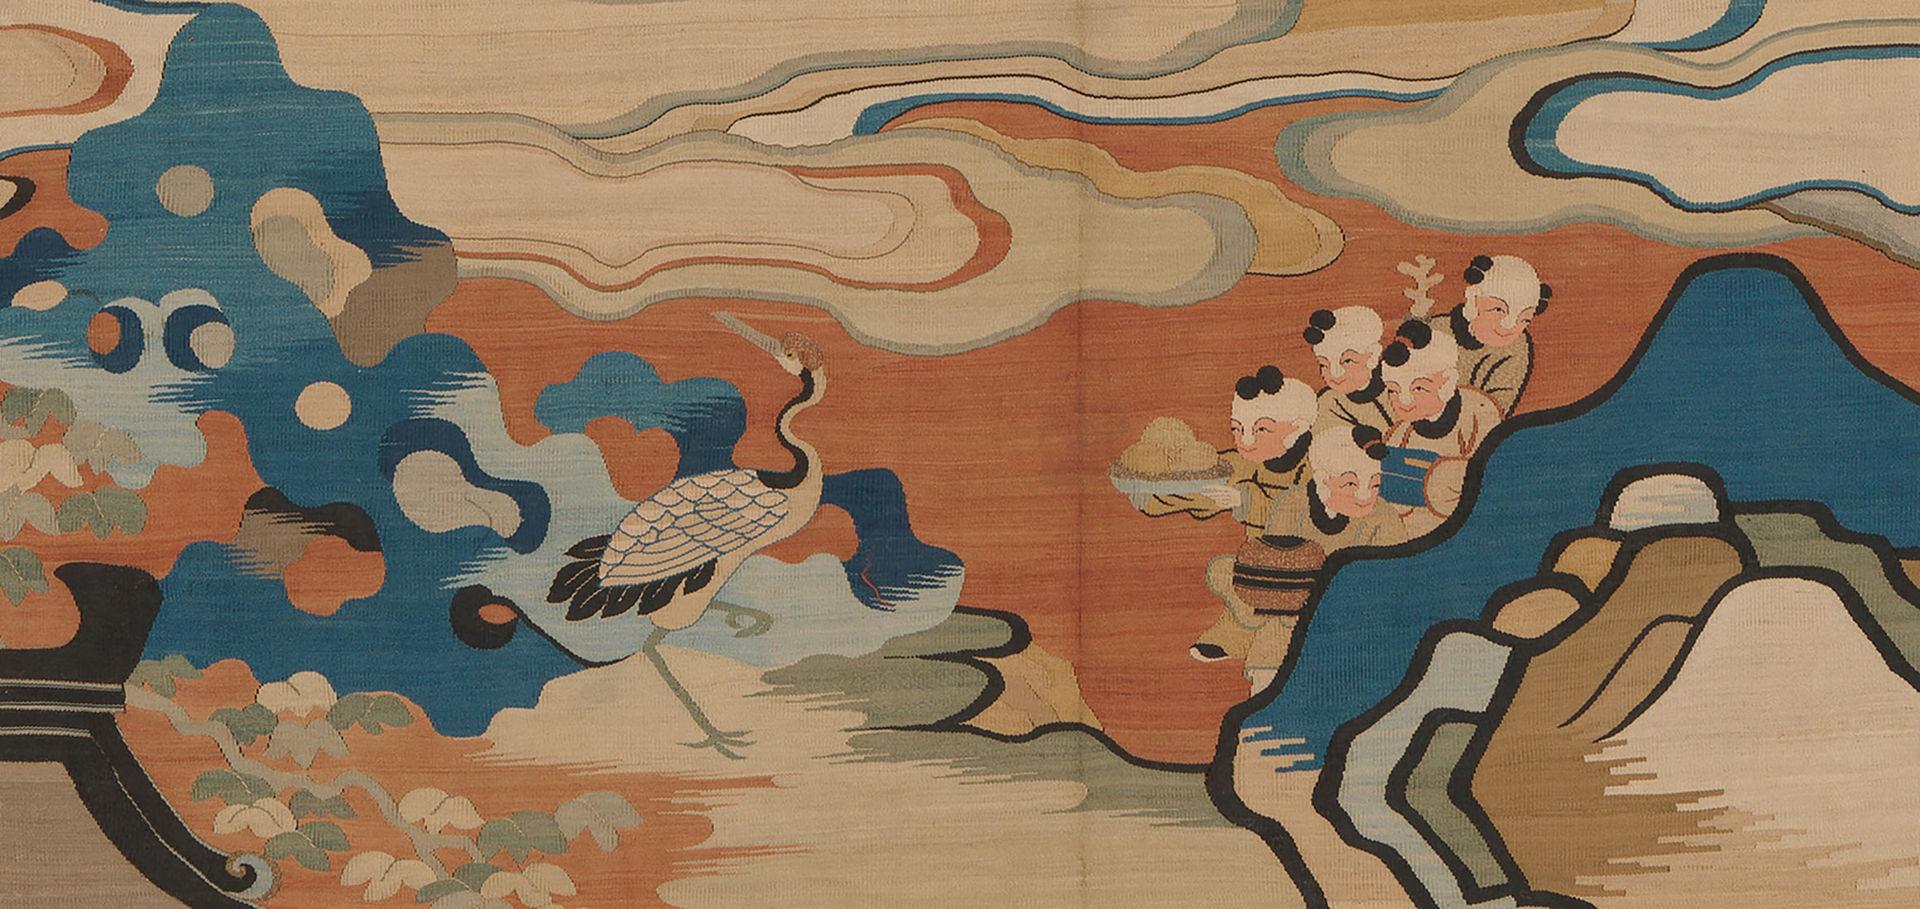
Panel with boys at play(detail), 17th century. Chinese, Qing dynasty (1644–1911). Silk, metallic thread, and feather thread tapestry, 89 x 68 3/4 in. (226.1 x 174.6 cm). The Metropolitan Museum of Art, New York, Purchase, The Vincent Astor Foundation Gift, 2011 (2011.158)
One spring day more than seven years ago, my office phone rang. It was Joyce Denny, a curator from The Met, calling from a Philadelphia auction house. She explained she was there to see a seventeenth-century Chinese tapestry, but when she had checked the tapestry's reverse, she saw strips of pressure-sensitive tape in damaged areas. She asked, "Can you do something about it?" I said, "Buy it, and I'll deal with it when it comes to The Met!" This is how I started my long journey with this beautiful tapestry, on display through May 27, 2019 in the exhibition Children to Immortals: Figural Representations in Chinese Art.
Discovering the Challenges
When the tapestry arrived at The Met in the spring of 2011, I assessed its condition. It is remarkable for a tapestry this old to have all four edges—the beginning and end of the weave at the upper and lower edge, and both selvedges—intact. The woven structure of the textile is tapestry plain weave and includes hatchings, non-horizontal wefts, pictorials, vertical slits, and dovetail features.
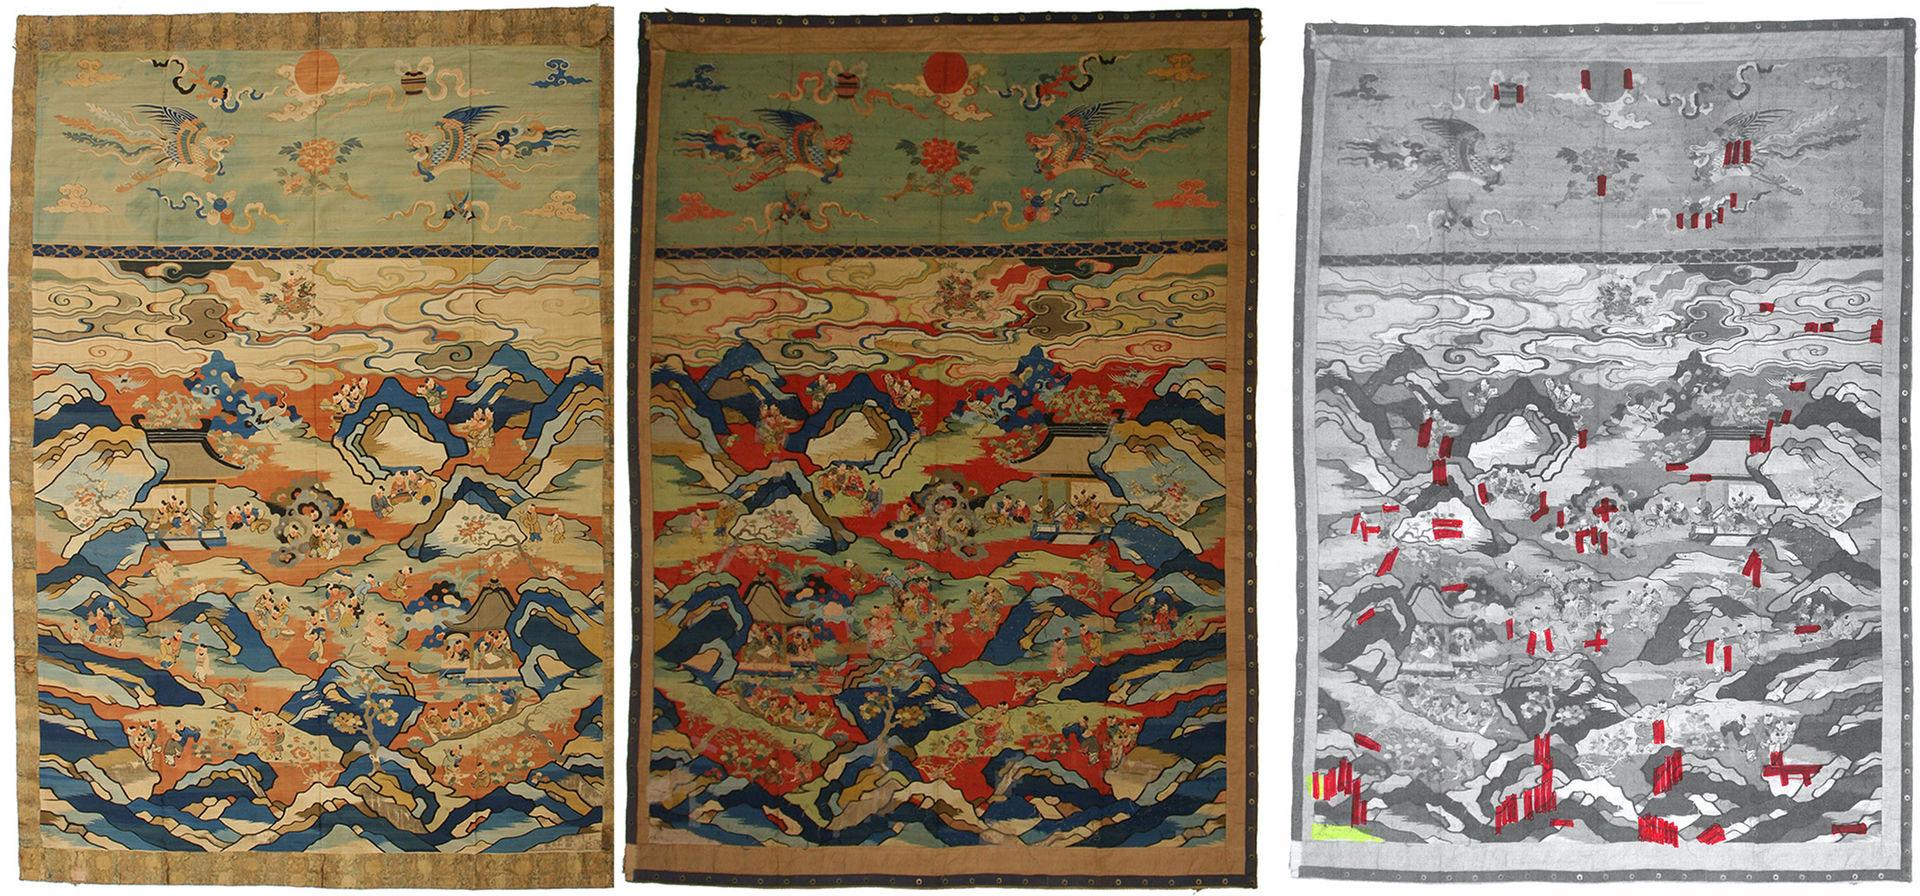
The tapestry before conservation. Left: Obverse, showing silk borders. Center. Reverse, showing tape with metal grommets. Right: Black-and-white photo showing the location of sticky tape in red.
The subject matter of the tapestry, a motif known as "One Hundred Boys," is highly engaging. The tapestry portrays groups of small boys at play, engaged in activities such as falconry, archery, fishing, boating, and reading. Several boys are depicted with symbolic references; one boy carries a three-legged frog, for example, which carries the meaning of great wealth. A tapestry like this would have been woven to express a family's longing for prosperity. A thin horizontal strip, woven with metal thread and silk thread, divides the tapestry. The upper portion depicts the sun in the sky with motifs of mystical birds.
The tapestry was very dusty, stained, and faded. It exhibited three vertical fold lines, as well as several horizontal creases, and it had features that were not original. Silk brocade borders had been machine-sewn on at the top, bottom, and sides (above left); these later additions were stained and disintegrating. The reverse of the borders and the edge of the tapestry had been covered with cotton fabric, and a fabric tape with metal grommets had been sewn on the back as a hanging system (above center).
Among the various wefts in different colors was a beige weft that had disintegrated badly, exposing bare warps (Chinese tapestry differs from European tapestry in that it has its warp in the vertical direction and its weft in the horizontal direction). To understand why only the beige weft had disintegrated, Federico Carò, a research scientist at The Met, analyzed the fiber and explained that an "abundance of Fe (iron) presence is the main cause of degradation." The beige color had been widely used in the lower portion of the tapestry, which showed the most severe warp damage and loss of weft.
The fragile condition of the beige fabric had been worsened by attempts to stabilize the tapestry's already aggravated situation by stitching the bare warps onto fabric patches and adding layers of pressure-sensitive tape to the tapestry's reverse.
During my examination, I counted a total of 101 strips of pressure-sensitive tape in thirty-three locations!

Lower right section of the tapestry, reverse side, showing fabric stabilized with pressure-sensitive tape
This pressure-sensitive tape, which resembled Scotch tape, had evidently adhered for a long time and could not be removed by simple mechanical force. I knew that removing this tape would be challenging. This material is not commonly used in historic treatments, so there were no protocols for handling it. I began to research pressure-sensitive tape and had several in-depth discussions with textile conservators, both within and outside the Museum, to find a solution for its removal.
The sticky tape would prove to be my biggest challenge. But before I could tackle it, I had to deal with another challenge: the silk borders.
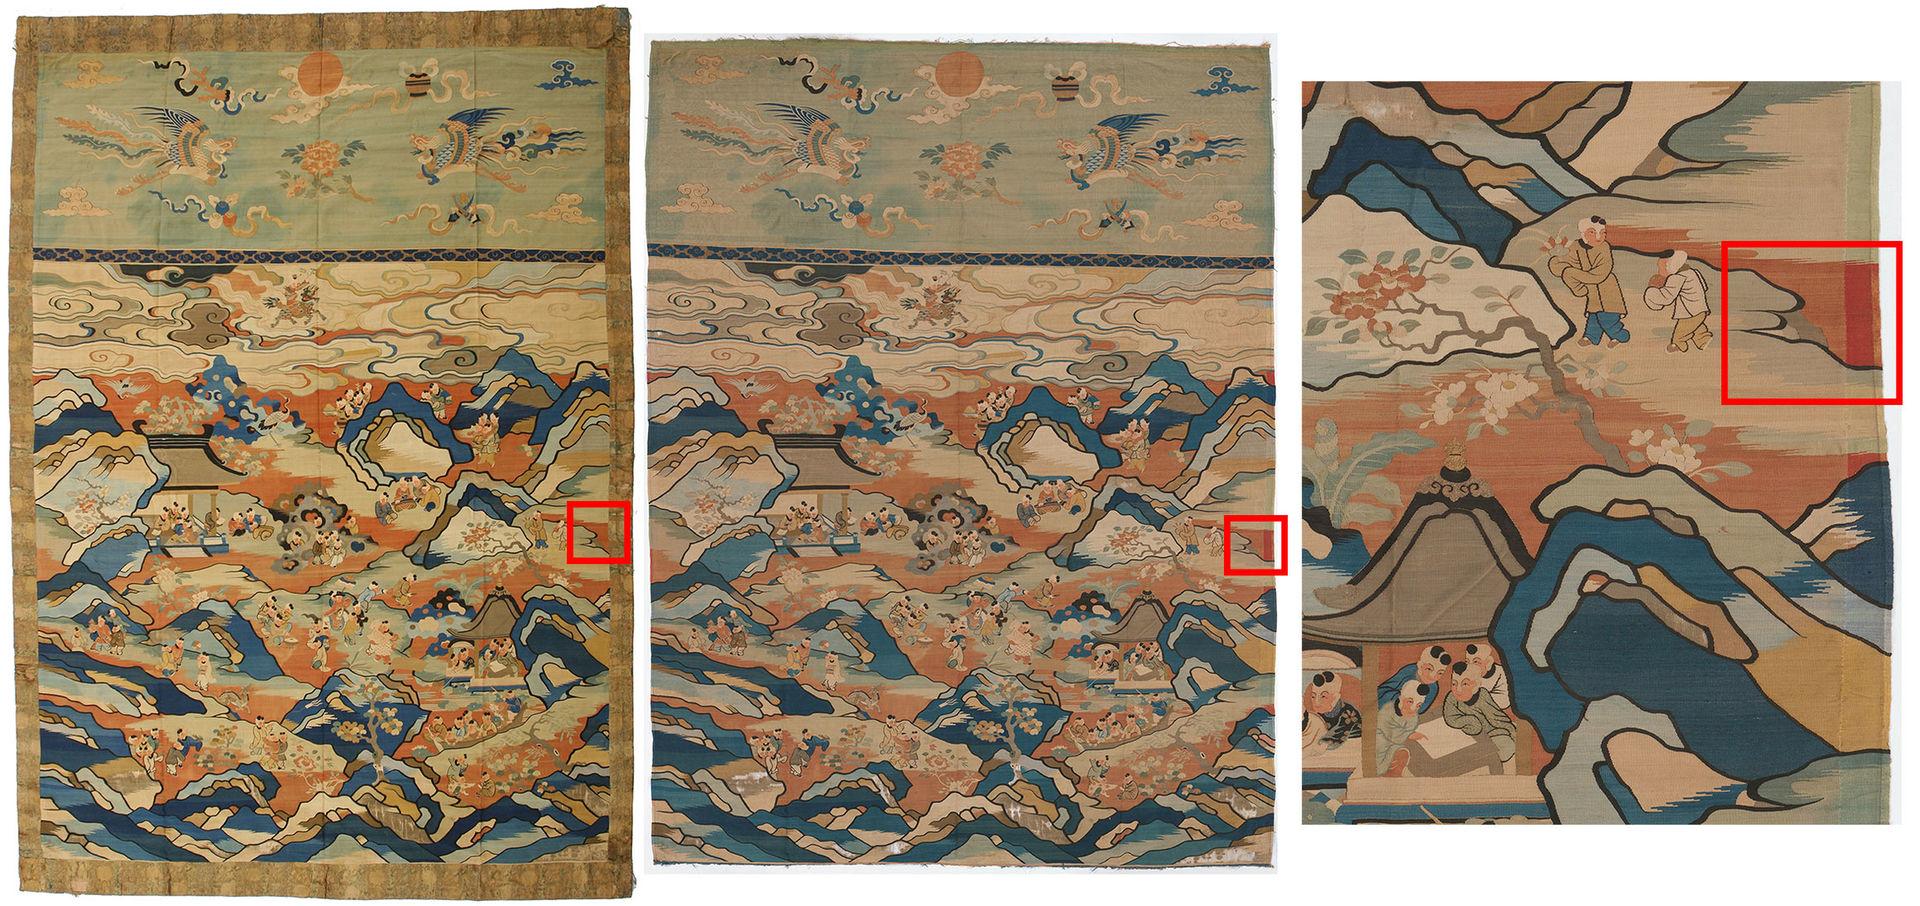
Tapestry before conservation. Left: Obverse, showing silk borders. Center: Obverse after removal of silk borders. Right: Close-up of detail showing the original colors preserved
The silk borders, which were a later addition, were turning to powder and shredding. Removing the borders—along with their cotton covering and the tape of metal grommets—revealed original selvedges on both sides of the tapestry (above center). It also uncovered the beginning and end of the weave at the top and bottom of the textile, something that is rarely seen. There was no record of when the silk borders had been added, but when they came off, the original colors underneath were well preserved, showing how much the color on the front of the tapestry had faded (above right)!
Tackling the Tape
After taking off the borders, I needed to detach the pressure-sensitive tape and fabric patches on the reverse of the tapestry. Before starting work on the tapestry itself, I carried out an experiment using fabricated mock-ups that had been constructed by sticking pressure-sensitive tapes on old silk fabrics to simulate the condition of the artwork.
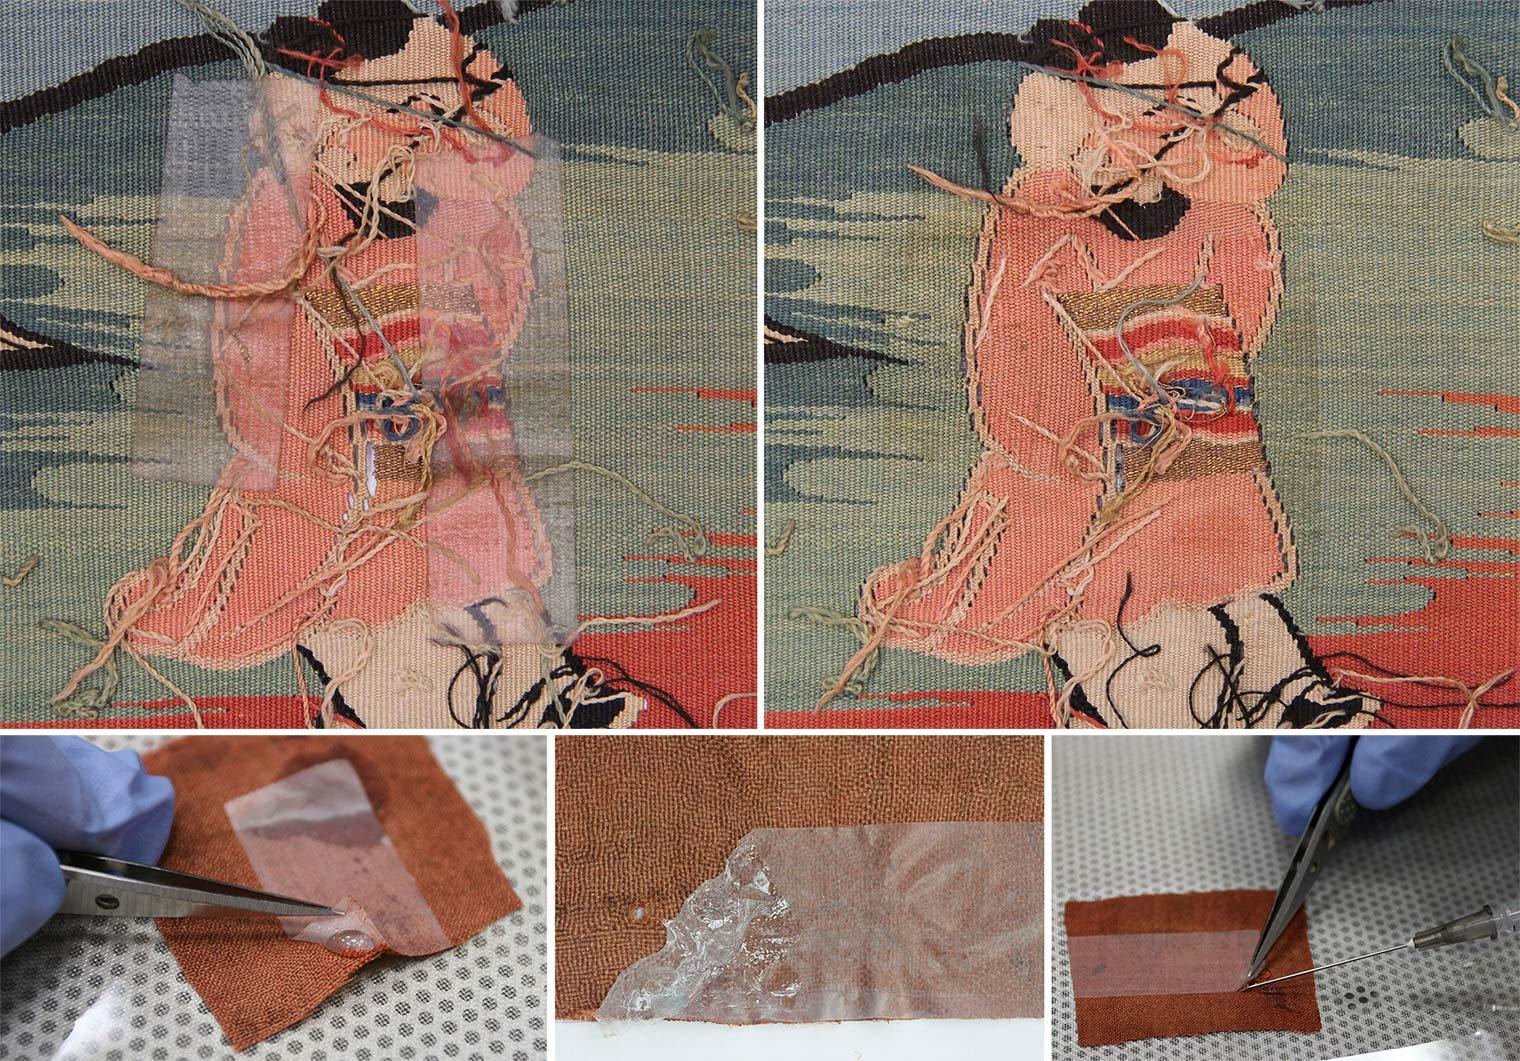
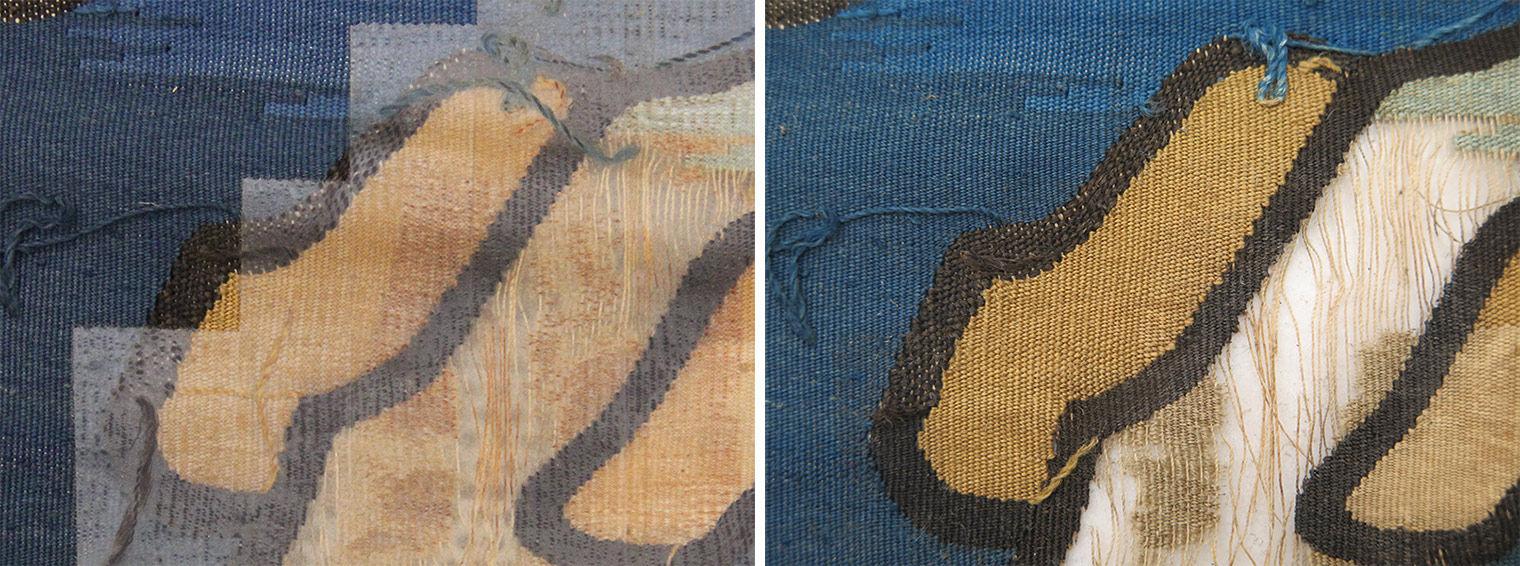
Top left: The figure of a boy on the reverse side, before the pressure-sensitive tape is removed. Top right: After the tape is removed. Bottom left: Water took too long to penetrate the fabric, as shown by the water surface tension under the tape. Bottom center: A pressure-sensitive tape, distorted and dissolved by pure acetone. Bottom right: A syringe injects a mixture of water and acetone in a 1:2 ratio under the tape; this mixture worked well to release the pressure-sensitive tape.
I had seen research that suggested that acetone could reactivate the adhesive of the pressure-sensitive tape, so I made various mixtures with water and acetone to find the ideal ratio of acetone and water. I tried pure acetone; acetone diluted with water in the ratio of 1:1, 1:2, and 2:1; and, finally, pure water. I placed the mockups under the fume hood on a suction table and applied the mixtures gradually, using syringes with needles, while I attempted to remove the tape. I also created a humidification chamber to re-activate the adhesive using acetone.
I found that water did not release the tape from the fabric. The water's surface tension was too great. It took too long to penetrate the fabric under the tape and left a "tideline" (a ring of micro-level deposits left by evaporation) on the fabric. On the other hand, I found that pure acetone was too strong; it dissolved both the adhesive and the vinyl substrate. Among the various mixtures, water and acetone in a ratio of 1:2 proved adequate to release the tape from the fabric. An added advantage of this mixture was that because acetone's surface tension is slight, it spread quickly into the fabric. I carried out the treatment with the water and acetone mixture on the suction table with 6.5x magnification, using suction low enough that the acetone mixture could reactivate and release the tape without creating a tideline. I applied the mixture to the tapestry and succeeded in releasing the tape while minimizing the loss of tapestry fiber that was pulled off together with the tape.
A number of areas where tape had been removed were still tacky. The reactivated adhesive residue that remained on the surface of the tapestry was not always visible to the naked eye. I attempted to remove the residual adhesive, and found that a brush pen worked well. Dipping the tip of the pen into the water and acetone mixture, I gently brushed it on the surface. Repeated brushing of the same spot eventually removed the remaining adhesive.
The Sticky Tape Returns
Museum projects can take a long time. At the end of the year, we had several priority projects for upcoming exhibitions, so we placed the tapestry aside. Six years later, in 2017, we removed the tapestry from storage so that it could be reviewed by Pengliang Lu, curator for the upcoming 2018 exhibition Children to Immortals: Figural Representations in Chinese Art.
Left: Detail showing original condition of the reverse. Right: Detail after removal of pressure-sensitive tape and adhesive residue using the hot-air gun and rubber cement.
However, when I retrieved the tapestry and lay it on a table to complete my work, I discovered that the adhesive residues that had been reactivated in 2011 were no longer tacky; they were now completely dry. So I had to deal with the condition once again!
This time, I turned to the conservators in the Department of Paper Conservation, who deal with many glues and adhesives on paper materials, including "my" pressure-sensitive tape. Marina Ruiz-Molina, an associate conservator, soon came to see the tapestry. After a thorough examination, she suggested using a velocity-controlled hot-air gun to reactivate the adhesive residues on the surface so that they could be picked up with eraser or rubber cement. She also showed me how paper conservators use a retractable eraser to target and treat areas locally.
I tried both the eraser and the rubber cement and found that while the regular eraser was unsuitable for picking up the adhesive residue from the tacky surfaces, the rubber cement worked very well. Picking up the residue from a small area was challenging using a large piece, so I decided to cut the rubber cement into small strips and insert them into the retractable eraser holder. This enabled me to treat the tacky areas bit by bit, without touching adjacent areas.
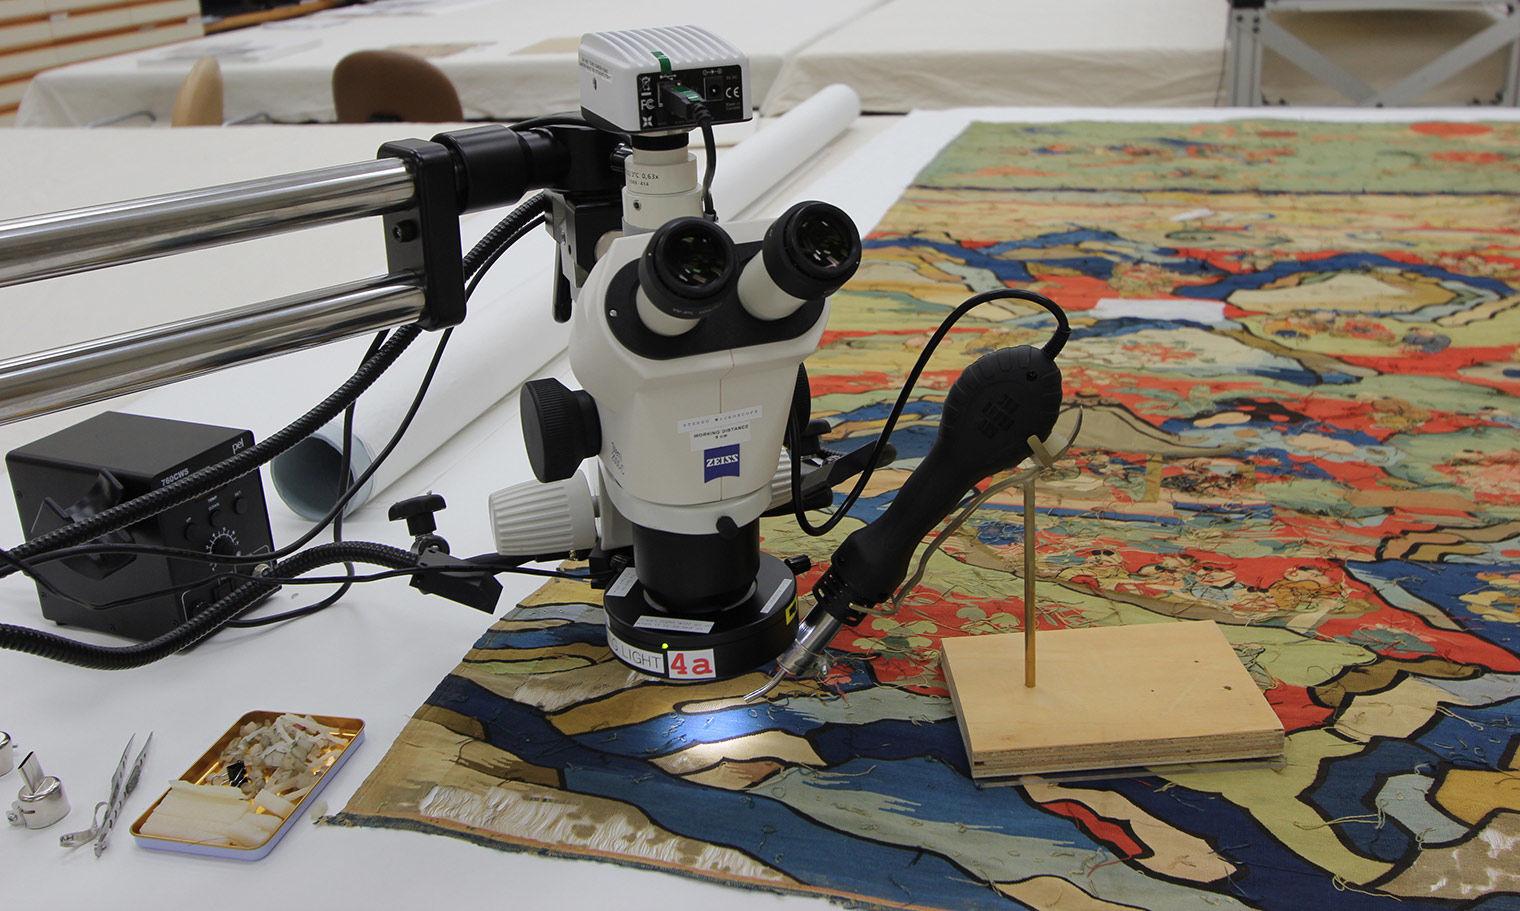
Set-up of adhesive residue removal from the tapestry/s reverse
Holding the hot-air gun steady by placing it on a gun holder custom-made by Warren Bennett, an objects conservation preparator at The Met, and using the portable Zeiss microscope with low magnification and ring light to illuminate the areas being treated, I was able to remove most of the adhesive residues on the reverse of the tapestry. Several areas that were in especially poor condition—in particular, the degraded beige weft—had to be left as they were, since it was more important to preserve the original wefts than to remove the adhesive residue on the reverse.
Stabilizing the Fragile Areas
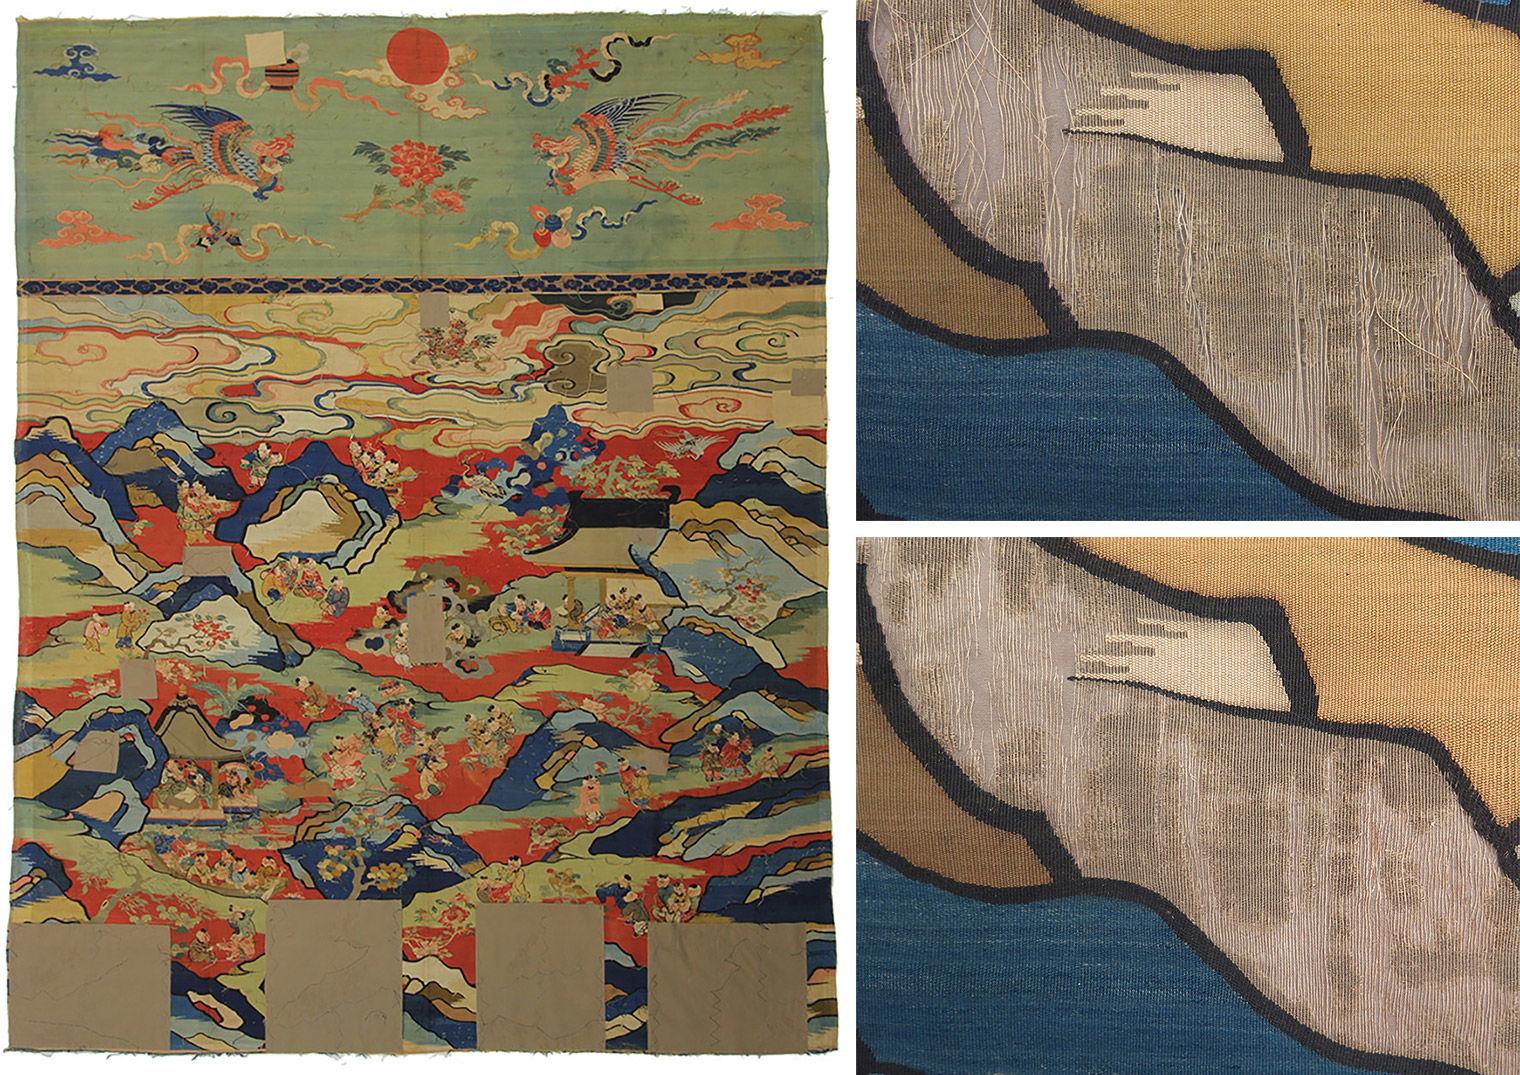
Left: Reverse of the tapestry with patches added for consolidation of fragile areas. Top right: Broken bare warps before consolidation. Bottom right: Warps after consolidation. The area shown took approximately 30 hours to stabilize.
The special adhesive-removal treatment took almost five months to complete. The installation date for the exhibition was rapidly approaching, but the tapestry was still in a vulnerable stage of treatment. Before I could prepare the tapestry for hanging, I had to take care of the fragile areas at the lower portion of the tapestry and remove the vertical folds and horizontal creases using humidification.
First, I placed large and small patches of colored fabric that matched the weft threads in the fragile areas on the tapestry's reverse and attached them using zigzag stitches (above left). Then I stabilized the fragile areas by stitching them to the patches using hair silk of matching color, couching down the exposed warps that had been broken as a result of disintegration of the weft and mistreatment by previous owners (above right). I also applied laid and couching stitches over the remaining wefts to provide extra stability.
Preparing for Display

Reverse of the tapestry showing the Velcro webbing at the top
Once the fragile areas had been stabilized, I backed the entire textile on a colored pima cotton fabric, stitching the two pieces together with zigzag stitches so that when the tapestry hangs, the weight is evenly distributed across the backing fabric, with extra support.
Pengliang and I agreed that it was important to reveal both selvedges to show the large scale of the loom. Only wealthy people could have afforded to have a piece woven on such a large scale We also wanted to reveal the beginning and end of the weave at the top and the bottom of the tapestry, since it was unusual that they had survived and this part of the weave would otherwise be rarely seen in the textile collection.
So I attached a strip of Velcro webbing at the top of the reverse side. This allowed us to hang the tapestry inside the permanent case in such a way that people could view the entire piece from the same angle, including both the selvedges and the weave at the top and bottom edge.
Seeing the Tapestry with Fresh Eyes
Although the original colors had faded, we could see what they had looked like from the areas preserved under the silk borders and on the reverse. I worked with Scott Geffert and Chris Heins, two imaging experts at The Met, to reconstruct the original colors on the obverse based on the well-preserved colors of the reverse. Scott and Chris collected color samples on the reverse using a spectrophotometer and transferred the information to an image of the front side of the tapestry.
Thanks to their work, an image of the reconstructed colors is displayed next to the tapestry, helping audiences imagine how it would have looked when it was first woven in the seventeenth century.
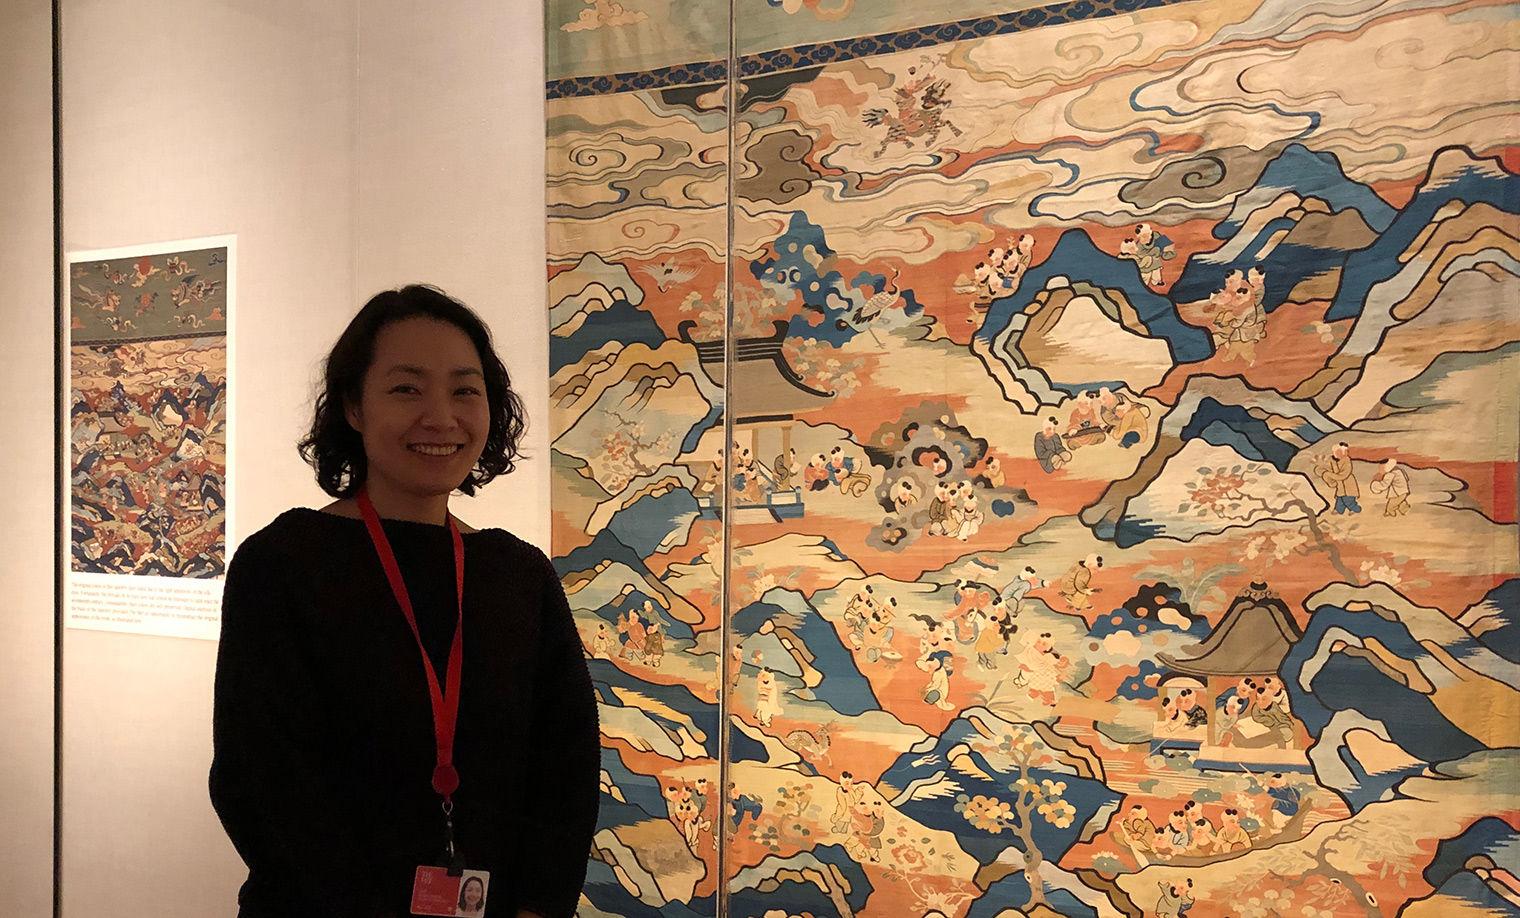
The author with the tapestry in gallery 220. Photo by Sumi Hansen
I finished preparing the tapestry for hanging only one day before the planned installation. In seventeen years of working at The Metropolitan Museum of Art, it was the first and longest project I had ever finished so close to its installation date! As I hung the tapestry in the gallery, I became excited and emotional. For the past eight years, I was only able to look at it with a conservator's eye, seeking solutions. Today I can finally appreciate the beauty of the tapestry as a Museum visitor would, and recount how I turned one of the worst nightmares a textile conservator could possibly face into a story with a happy ending.
Acknowledgements
Conservation of this rare tapestry was a collaborative effort. I wish to express my gratitude to Janina Poskrobko, Conservator in Charge, Department of Textile Conservation; Pengliang Lu, Associate Curator, Department of Asian Art; and Maxwell Hearn, Douglas Dillon Chairman of the Department of Asian Art; as well as to my many colleagues who contributed their talents to this project: Warren Bennett, Associate Conservation Preparator, Department of Objects Conservation; Barbara Bridgers, Head of Imaging, Photograph Studio; Federico Carò, Research Scientist, Department of Scientific Research; Joyce Denny, former Assistant Curator, Department of Asian Art; Scott Geffert, Senior Imaging Manager, Photograph Studio; Chris Heins, Imaging Production Assistant, Photograph Studio; Marina Ruiz-Molina, Associate Conservator, Department of Paper Conservation; and Nobuko Shibayama, Research Scientist, Department of Scientific Research.


